Sunday, July 28, 2024

Get 200+ FPS in Free Fire: Optimize BlueStacks 5 Settings for Low-End PCs

               Get 200+ FPS in Free Fire: Optimize BlueStacks 5 Settings for Low-End PCs


Well, for gamers on a low-end PC, it is hard to struggle much for a smooth and high FPS in Free Fire. If you apply the right settings and make a few adjustments, you can actually get over 200 FPS while playing Free Fire on Bluestacks 5. This article will give you a step-by-step guide on the best way possible to optimize Bluestacks 5 settings for Free Fire to decrease lag and maximize performance on lower-end systems.


Understanding FPS and Its Importance


Frames per second refer to the number of frames—which are essentially images—that a device is capable of rendering per second while the game is running. Higher FPS ensures smoother animations and quicker responses. More importantly, this is where Free Fire, among many fast-paced games, takes precedence. Keeping the FPS high, therefore, literally redefines performance and gameplay for competitive players.


### **Step-by-Step Guide to Optimize BlueStacks 5 for 200+ FPS**


**1. Update BlueStacks to the Latest Version**


First, ensure that you are using the latest version of BlueStacks 5. Updates typically include performance improvements and bug fixes that help you get more FPS. Keep checking for updates and install them.


**2. Adjusting Performance Settings in BlueStacks**


a. **Open BlueStacks and go to Settings**: The settings menu can be opened by the gear icon at the bottom right corner of the BlueStacks window.


- **Engine tab**: On the left side of the Settings window, click on the "Engine" tab. Here you will find mostly the performance-related settings.


- **Performance Mode**: Change "Performance mode" to "On." This will ensure high performance at some cost to graphics quality to achieve a greater FPS.


- **Adjust CPU and RAM Allocation**: Allot CPU and RAM according to the capacity of your system. Increasing these definitely will improve performance, but be careful not to overdo it, lest it hamper other apps running on your PC.


**3. Configure Graphics Settings**


- **Enable Graphics Acceleration**: In the "Graphics" section under the Engine tab, make sure that "Graphics acceleration" is turned on. This uses your GPU to enhance performance.


**Set "Graphics Mode" to "Performance":** Change the "Graphics mode" to "Performance" from the available "Compatibility" or "Balance." This means that frame rate comes ahead of visual fidelity.


**Adjust Resolution:** A small drop in resolution will make a big difference with FPS. Pick one that will let you have a good view while boosting performance a bit. You could run games smoothly on a low-end PC using an even 1280x720 resolution.


**4. Free Fire In-Game Settings Optimization


This, apart from the settings of BlueStacks, is for the in-game settings optimization of Free Fire. Do the following steps: 


- **Open Free Fire and go to Settings**: In the game itself, open the settings menu. 


- **Set Graphics to "Smooth"**: Set the "Smooth" graphics setting instead of "HD" or "Ultra." It reduces a lot of graphical load from your system.


• **Frame Rate Adjust**: Change this to "High" or "Ultra" when possible. This increases the FPS of the game.


• **Turn Off Unnecessary Features**: Switch off features like shadows or any other graphical enhancement that might impact performance.


**5. Update Graphics Drivers**


Keep your graphics drivers up to date. If the drivers are old, this will bottleneck your performance and you won't get the desired FPS. Go to your GPU manufacturer's webpage (NVIDIA, AMD, or Intel) to obtain the drivers.


**6. Close Background Applications**


All the applications running in the background might be drawing all your precious system resources and causing your system to slow down. Close all unnecessary programs running on your system to free up CPU, RAM, and network resources for BlueStacks and Free Fire.


**7. Run Game Booster Software**


You can also use game booster software to optimize your system performance while gaming. All of these software claim adjustments to system settings and close background processes which are not needed so that you have the best FPS and reduced lagging.


### **Conclusion**


Run Free Fire at 200+ FPS on a low-end PC by making the right adjustments in BlueStacks 5 and the in-game settings. The BlueStacks update, configuration of the performance settings, optimizing graphics, and ensuring your system works fluently guarantee a huge improvement in your gaming experience. Apply these tips for a more fluid and responsive gameplay experience in Free Fire.


1:For ultimate power of your pc type this command in power shell:


                     powercfg -duplicatescheme e9a42b02-d5df-448d-aa00-03f14749eb61


Share your results or any questions you may have in the comments below. Good luck, and game on!

Monday, July 15, 2024

Listed here are some of the top six settings and adjustments which you can execute on your PC to make it faster. 6 Best Settings to Speed Up Your Slow PC: Boost Performance Like A Pro!

Sure! Here are six settings and tweaks to get your slow PC fast and back in action:

##### Optimize Startup Programs


- **Definition**: Various programs executing from startup can make your PC's boot time more sluggish.


- **How to Adjust**: 


  - **Windows**: Open Task Manager by pressing Ctrl + Shift + Esc and go to "Startup". Disable programs that you don't want starting up.


  - **Mac**: System Preferences ► Users & Groups ► Login Items ► Remove any unnecessary items.


### 2. Power settings


- **Description**: Running it in "Balanced" or "Power saver" mode can restrict the performance of your computer.

- ** How to Correct**:

    - ** Windows**: Control Panel > Power Options > Set to "High performance".

    - ** Mac**: System Preferences > Energy Saver > Slider to "High performance".


### 3. **Increase Virtual Memory**

- **Description**: Virtual memory helps to compensate for low RAM on your PC and makes use of part of your hard drive to provide an extra memory.


- **How to Adjust**:


  - **Windows**: Control Panel > System > Advanced system settings > Performance settings > Advanced tab > Virtual memory > Change > Set a custom size.


  - **Mac**: macOS manages virtual memory automatically, but ensuring you have enough free disk space can help.


### 4. **Defragment Your Hard Drive**


- **Description**: If the data on your hard drive is fragmented, then it can result in long read/write times.


- **How to Adjust**:


- **Windows**: Open "Defragment and Optimize Drives" > Your hard drive > Click "Optimize".


  - **Mac**: macOS does defragmentation automatically, but you can assist by maintaining a free space of not lower than 10-20%.


 irrelevant  


### 5. **Update Drivers and Software**


- **Description**: Outdated drivers and software cause your computer to become slow.


- **How to Adjust


- **Windows**: Device Manager > Update driver for key components like graphics and network, etc. > Check for Windows Updates.


  - **Mac**: App Store > Updates > Install available updates.


### 6. **Adjust Visual Effects for Best Performance**


- **Description**: Turning off fancy visual effects can conserve system resources.


- **How to Adjust**:


- **Windows**: Control Panel > System > Advanced system settings > Performance settings > adjust for best performance.


   - **Mac**: System Preferences > Accessibility > Display > Reduce motion and transparency checkbox.


### Additional Tips:


- **Clean Up Disk Space**: Possibly free up some of it using Disk Cleanup that comes integrated with the Windows operating system or CleanMyMac – a favourite across users.


** Malware Scan**: Run a trusted Anti-virus/Anti-malware to ensure your system is not being slowed by a malware infection.


 By implementing all the above settings and, most important, by maintaining your PC health on a regular basis, you can derive a massive improvement in performance in your computer.

Thursday, July 11, 2024

Free Fire Best New Keymapping for PC: No Aim Stuck, No Joystick Stuck, No Glitch!

Free Fire Best New Keymapping for PC: No Aim Stuck, No Joystick Stuck, No Glitch!


Are you tired of dealing with aim issues, joystick malfunctions, and glitches while playing Free Fire on your PC? Look no further! This guide will introduce you to the best new keymapping settings that will enhance your gameplay experience, ensuring smooth, glitch-free sessions.


### Why Keymapping Matters


Effective keymapping can significantly improve your control over the game, making it easier to aim, shoot, move, and perform other actions seamlessly. The right keymapping eliminates common issues like aim stuck, joystick stuck, and other glitches that can hinder your performance.


### Optimized Keymapping Settings for Free Fire on PC


#### Step 1: Setting Up BlueStacks


Before diving into keymapping, ensure you have the latest version of BlueStacks installed. We recommend BlueStacks 5 Pie 64-bit for the best performance.


1. **Download and Install BlueStacks**: Visit the [BlueStacks official website](https://www.bluestacks.com) and download the latest version.

2. **Launch Free Fire**: Open Free Fire from the BlueStacks home screen.


#### Step 2: Accessing the Controls Editor


1. **Open Game Controls**: Click on the "Game controls" icon located on the side toolbar of BlueStacks.

2. **Select Controls Editor**: From the dropdown menu, choose "Controls editor."


#### Step 3: Customizing Your Keymapping


1. **Tap Spot**: Drag and drop the "Tap spot" control from the Controls Editor to the desired location on your screen. Assign it a key that you find comfortable.


   - **Movement (Joystick)**: Place the joystick control on the movement area and assign keys (e.g., W, A, S, D) for forward, left, backward, and right movements.


2. **Aim and Shoot**: For precise aiming and shooting:


   - **Fire Button**: Place the fire button on the shoot area and assign it to the left mouse button (LMB).

   - **Aim Button**: Place the aim button and assign it to the right mouse button (RMB).


3. **Quick Actions**: Ensure quick response by mapping frequently used actions to easily accessible keys.


   - **Reload**: Assign the "R" key to reload.

   - **Jump**: Assign the space bar for jumping.

   - **Crouch**: Use the "C" key for crouching.

   - **Prone**: Assign the "Z" key to go prone.


4. **Inventory and Equipment**: Customize keys for quick access to your inventory and equipment.


   - **Inventory**: Assign the "I" key to open the inventory.

   - **Med Kit**: Assign the "H" key for using med kits.

   - **Weapons**: Map number keys (1, 2, 3) for switching between weapons.


5. **Map and Communication**: Enhance your strategic play by setting up keys for map and communication.


   - **Map**: Assign the "M" key for the map.

   - **Voice Chat**: Use the "V" key for voice chat.


#### Step 4: Saving and Testing Your Keymapping


1. **Save Settings**: Once you’ve set up your keys, click on "Save" to apply the changes.

2. **Test Your Controls**: Play a few matches to test your new keymapping. Adjust any keys that don’t feel comfortable or responsive.


### Tips for Optimal Gameplay


- **Adjust Mouse Sensitivity**: Fine-tune your mouse sensitivity settings in the Controls Editor to match your playstyle.

- **Use On-Screen Controls**: Enable on-screen controls initially to get familiar with your new keymapping.

- **Practice**: Spend some time practicing in training mode to get used to the new controls and improve your muscle memory.


### Conclusion


By following these steps, you can create a customized keymapping setup for Free Fire on PC that eliminates common issues like aim stuck, joystick stuck, and other glitches. Enjoy a smoother, more responsive gaming experience and take your Free Fire skills to the next level!


Ready to dominate the battlefield with your optimized controls? Dive into Free Fire now and experience the difference!


---


For more tips and tricks on optimizing your gaming setup, stay tuned to our blog. Happy gaming!

Free Fire Best Custom HUD: Cleaned and Clear for Easy Gameplay

Free Fire Best Custom HUD: Cleaned and Clear for Easy Gameplay


Are you struggling with the default HUD settings in Free Fire? A custom HUD (Heads-Up Display) can significantly enhance your gaming experience, making controls more intuitive and gameplay more fluid. This guide will show you how to set up the best custom HUD for Free Fire, focusing on a clean and clear layout that's easy to play with.

### Why Customize Your HUD?

Customizing your HUD allows you to:
- **Improve Reaction Time**: Placing essential controls within easy reach can speed up your response time.
- **Enhance Visibility**: A clean HUD ensures that your screen isn't cluttered, helping you see enemies and objectives more clearly.
- **Personalize Controls**: Tailor the layout to fit your unique playstyle, making the game more comfortable and enjoyable.

### Setting Up the Best Custom HUD

#### 1. Launch Free Fire and Access HUD Settings

1. **Open Free Fire**: Start Free Fire from your device’s home screen.
2. **Go to Settings**: Click on the gear icon in the top-right corner of the home screen.
3. **Select Controls**: In the settings menu, navigate to the "Controls" tab.
4. **Custom HUD**: Tap on "Custom HUD" to begin editing your layout.

#### 2. Organize Your Screen for Optimal Play

- **Move Essential Buttons to Thumbs’ Reach**:
  - **Fire Button**: Place it on the right side where your thumb can quickly tap it.
  - **Movement Joystick**: Position it on the left side, under your left thumb.

- **Strategically Place Other Controls**:
  - **Reload, Jump, and Crouch**: These should be near the fire button but not too close to avoid accidental taps.
  - **Grenades and Healing Items**: Place these around the center for quick access during intense firefights.

- **Minimize Distractions**:
  - **Map and Other Info Panels**: Keep these at the top or sides, ensuring they don’t obstruct your view.
  - **Inventory and Settings**: Position these at the bottom or corners where they’re accessible but not intrusive.

#### 3. Test and Adjust

- **In-Game Testing**: After setting up your HUD, play a few matches to see how it feels.
- **Fine-Tuning**: Adjust button sizes and positions as needed. Ensure that you can comfortably reach all necessary controls without looking away from the action.

### Recommended Layout for Clean and Clear Gameplay

Here's a suggested layout that balances functionality and clarity:

- **Fire Button**: Right side, mid-level height.
- **Movement Joystick**: Left side, lower corner.
- **Jump/Crouch**: Near the fire button but spaced out.
- **Aim Button**: Just above the fire button.
- **Inventory**: Bottom-center for easy access.
- **Map**: Top-left corner, out of the main view.
- **Special Abilities/Skills**: Right side, near the fire button for quick access.

### Tips for an Effective Custom HUD

- **Simplicity is Key**: Avoid overcrowding your screen. Less is more when it comes to HUD design.
- **Consistency**: Keep similar functions grouped together to minimize confusion.
- **Regular Updates**: As you become more familiar with the game, continue to tweak your HUD for improved performance.

### Conclusion

A well-designed custom HUD can be a game-changer in Free Fire. By placing controls within easy reach and keeping your screen uncluttered, you can enhance your gameplay experience and gain a competitive edge. Follow these steps and recommendations to create a HUD that’s clean, clear, and perfectly tailored to your playstyle. 

Happy gaming!
 

Wednesday, July 10, 2024

How to play Free Fire with Smart controls on BlueStacks 5

         How to play Free Fire with Smart controls on BlueStacks 5


  • How will this help?

  • You can play Free Fire on BlueStacks 5 using Smart controls for a significantly enhanced gameplay experience. Smart controls will allow you to perform different in-game actions much more quickly and also remove unnecessary on-screen keys.  
  • Are you ready to lead your team to victory and immortalize your name among the legends?
  • Free_Fire_Onboarding.gif

  • What are the Smart controls to play Free Fire?
  • Movement controls
  • KeyAction
    Screenshot_1.pngMove forward, left, backward, right
    shift.pngSprint
    3.pngJump
    C.pngCrouch 
    Z.pngProne
  •  
  • Combat controls
  • KeyAction
    ezgif-2-6dd0022ce0.gifAim and pan
    Screenshot_3 - Copy (2).pngSwitching weapons
    Screenshot_3.pngFire
    Screenshot_3 - Copy.pngScope / Cook grenade
    R.pngReload
    4.pngHealing
    5.pngGrenade
    F1.pngFree mouse cursor
    X.pngHold to free mouse cursor
    V.pngLook around
    E.pngSkill
    Q.pngGloo Wall
    Y.pngAkimbo
  •  
  • General controls
  • KeyAction
    Screenshot_1.pngPick up item
    M.pngOpen Map
    TAB.pngOpen Bag
    F.pngInteract
    G.pngSecondary interact
    B.pngRevive teammate
    E.pngFollow
    Screenshot_3 - Copy.pngHonk
    3.pngBoost
    Q.pngPlant / defuse bomb
    T.pngUse mic
    Y.pngSound
    ctrl.pngUse surfboard 
    11.pngSwipe loot
    Screenshot_2.pngCharacter emote
    Screenshot_2 - Copy.pngPet emote

How to Create and Edit Keyboard Controls for Free Fire on BlueStacks 5

 ### How to Create and Edit Keyboard Controls for Free Fire on BlueStacks 5


### How will this help?

This comprehensive guide will walk you through everything you need to know about setting up and customizing key controls for Free Fire on BlueStacks 5. By the end of this guide, you will learn how to view, edit, and create game controls, making your gameplay smoother and more enjoyable.


**In this article, you will learn:**

- How to view game controls


- How to edit and create game controls


*New feature alert!* You can now add a custom crosshair in the latest version of BlueStacks to enhance your aiming accuracy!


**Note:** For the best gameplay experience, we recommend using BlueStacks 5 Pie 64-bit.

---


### Viewing Game Controls for Free Fire

**Step 1:** Launch Free Fire from your BlueStacks home screen.

![Launch Free Fire]

**Step 2:** Once the game has launched, click on the "Game controls" icon on the side toolbar.

![Game Controls Icon]

**The "Game controls" menu allows you to:**

- **Toggle Game Controls On/Off:** Ensure that game controls are enabled. A blue slider indicates that they are active. Click on the slider to toggle them on or off.

- **On-Screen Controls:** Enable this option to see all assigned keys on your game screen. This is especially useful for new players.

- **Opacity:** Adjust the opacity of your on-screen keys using this slider.

- **Scheme:** Choose from available control schemes in BlueStacks 5. This includes any control schemes you might have imported from BlueStacks 4. [Learn more about importing control 

- **Mouse Sensitivity:** Optimize your in-game cursor speed with this option.

- **Controls Editor:** Edit existing keys or create new ones using the Advanced Controls Editor. 


![Game Controls Menu]


### Creating and Editing Controls for Free Fire

**Step 1:** Click on the "Game controls" icon on the side toolbar. From the dropdown menu, select "Controls editor."

![Controls Editor]


**Step 2:** The "Controls editor" window will open next to BlueStacks, displaying all active keys for the selected control scheme.

![Active Keys]


**Step 3:** To edit an existing control key, hover your cursor over that key and click on the gear icon that appears. This allows you to modify the attributes of that key.

![Edit Control Key]


**Step 4:** To create a new control key, drag and drop a control from the "Controls editor" window to your desired location on the game screen. Set its attributes as per your preference.

![Create Control Key]


**Step 5:** After making your desired changes, click on "Save."

![Save Changes]


Close the Controls editor window and start playing Free Fire with your newly saved key configurations!


---

**Explore More:**

- [Learn how to play Free Fire using Smart controls on BlueStacks 5]


By following these steps, you can fully customize your gaming experience on Free Fire using BlueStacks 5. Happy gaming!

How to play Free Fire at 90 FPS on BlueStacks 5

 **How to Play Free Fire at 90 FPS on BlueStacks 5**

Unlock a smoother and more immersive gaming experience in Free Fire by achieving 90 FPS on BlueStacks 5. Follow these steps to enhance your gameplay with improved graphics and heightened accuracy:

### Step 1: Change the Device Profile

1. Click on the gear icon in the side toolbar of BlueStacks 5 to open the Settings menu.

2. Navigate to the "Phone" tab and under "Device profile," select "ASUS ROG 2."

3. Click on "Save changes" to apply the settings.


### Step 2: Enable High Frame Rate

1. In the Settings menu, go to the "Performance" tab.

2. Find the "Frame rate" section and toggle "Enable high frame rate."

3. Slide the FPS counter to "240" for optimal performance.

4. Click on "Save changes" and restart BlueStacks 5.


### Step 3: Disable VSync

#### NVIDIA Users:

1. Open the "NVIDIA Control Panel" from your taskbar search menu.

2. Select "Manage 3D Settings" and then "Program settings."

3. Choose "App Player (HD-Player.exe)" from the drop-down menu.

4. Scroll down to "Vertical Sync" and set it to "Off."

5. Click on "Apply" to save the settings and restart BlueStacks 5.

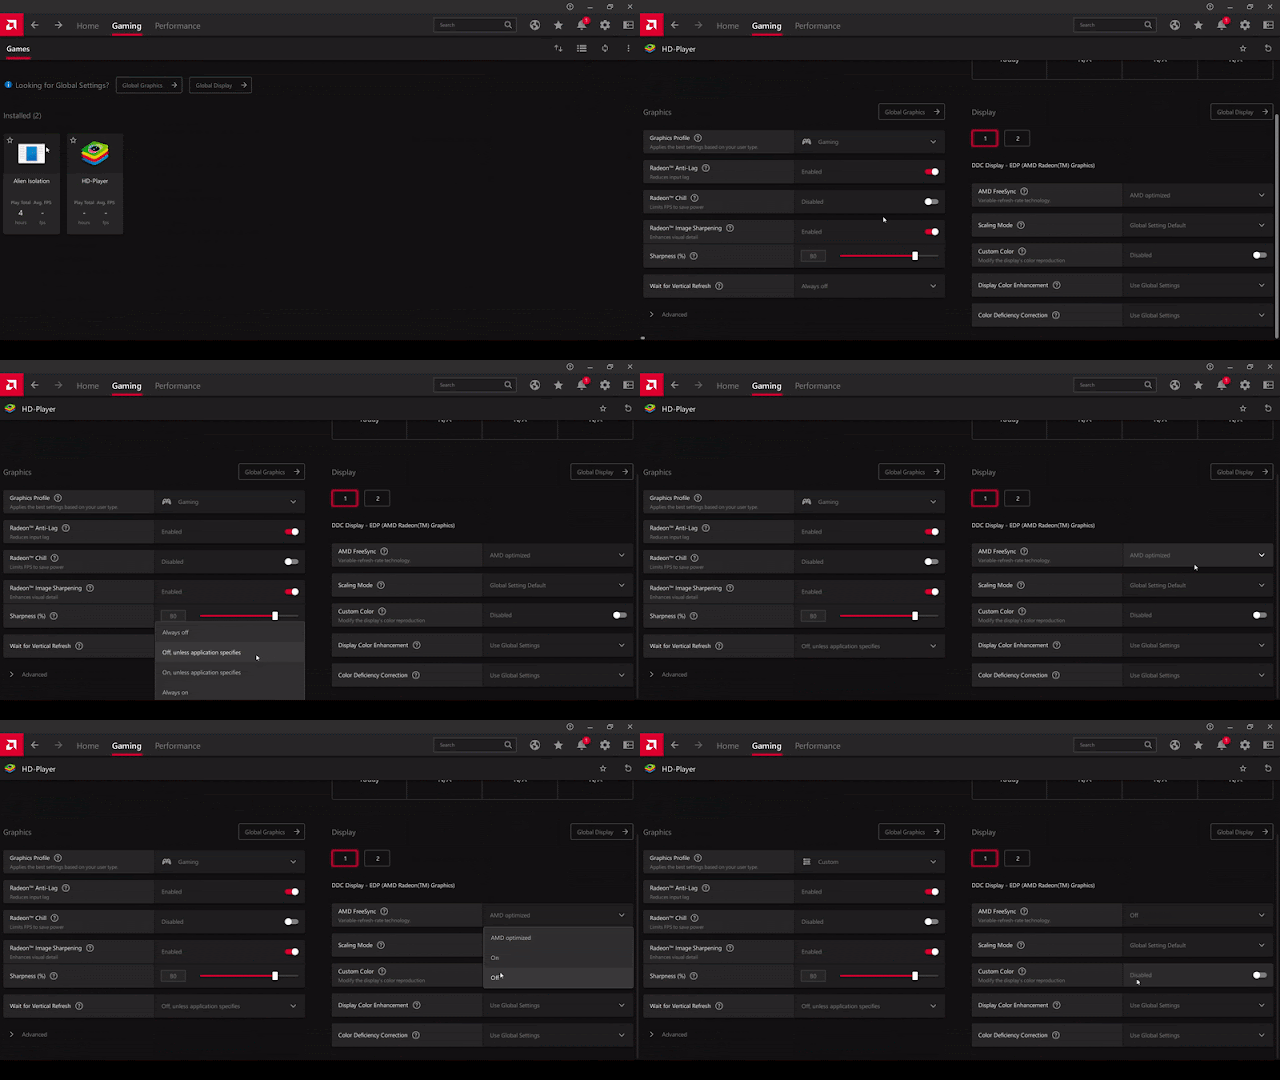
#### AMD Users:

1. Launch "AMD Radeon Software" and click on the "Gaming" tab.

2. Select "More options" and then "Add A Game."

3. Navigate to "C:\Program Files\BlueStacks" and select "HD-Player.exe."

4. Under the Graphics section, set "Wait for Vertical Refresh" to "Off, unless application specifies."

5. Under the Display section, set "AMD FreeSync" to "Off."

6. Restart BlueStacks 5 to apply the changes and enjoy Free Fire at 90 FPS.

By following these steps, you can optimize BlueStacks 5 to run Free Fire at 90 FPS, ensuring smoother gameplay and a competitive edge in your battles. Get ready to elevate your gaming experience to the next level!

Tuesday, July 9, 2024

Recommended settings for Free Fire on BlueStacks 5

 **Optimize Your Free Fire Gameplay on BlueStacks 5**


Are you looking to enhance your Free Fire experience on BlueStacks 5? By applying the right settings, you can enjoy smoother gameplay with reduced lag. Here’s a step-by-step guide on how to optimize BlueStacks 5 for Free Fire:


### Step 1: Launch BlueStacks 5

Start by opening BlueStacks 5 on your computer.


### Step 2: Access Settings

Click on the gear icon located in the side toolbar to open the Settings menu.


### Step 3: Adjust Performance Settings

- **CPU Allocation**: Set it to "High (4 cores)" to ensure your game gets enough processing power.

- **Memory Allocation**: Allocate a minimum of "3GB" of memory to support seamless gameplay.

- **Performance Mode**: Select "High Performance" to prioritize game performance over other factors.


### Step 4: Save Changes

After adjusting the settings, click on the "Save changes" button at the bottom of the Settings menu.

### Step 5: Restart BlueStacks 5

To apply the new settings, BlueStacks 5 will prompt you to restart. Click on "Restart now" to proceed.

### Step 6: Launch Free Fire

Once BlueStacks 5 restarts with the optimized settings, launch Free Fire and experience improved gameplay performance.


### Additional Tips:

- Ensure you are using BlueStacks 5 Pie 64-bit for the best performance.

- Consider adding a custom crosshair for better aiming accuracy.


By following these steps, you can significantly reduce performance-related issues and enjoy a smoother and more enjoyable Free Fire gaming experience on BlueStacks 5. Now, get ready to dominate the battlefield!