How to play Free Fire at 90 FPS on BlueStacks 5
**How to Play Free Fire at 90 FPS on BlueStacks 5**
Unlock a smoother and more immersive gaming experience in Free Fire by achieving 90 FPS on BlueStacks 5. Follow these steps to enhance your gameplay with improved graphics and heightened accuracy:
### Step 1: Change the Device Profile
1. Click on the gear icon in the side toolbar of BlueStacks 5 to open the Settings menu.
2. Navigate to the "Phone" tab and under "Device profile," select "ASUS ROG 2."
3. Click on "Save changes" to apply the settings.
### Step 2: Enable High Frame Rate
1. In the Settings menu, go to the "Performance" tab.
2. Find the "Frame rate" section and toggle "Enable high frame rate."
3. Slide the FPS counter to "240" for optimal performance.
4. Click on "Save changes" and restart BlueStacks 5.
### Step 3: Disable VSync
#### NVIDIA Users:
1. Open the "NVIDIA Control Panel" from your taskbar search menu.
2. Select "Manage 3D Settings" and then "Program settings."
3. Choose "App Player (HD-Player.exe)" from the drop-down menu.
4. Scroll down to "Vertical Sync" and set it to "Off."
5. Click on "Apply" to save the settings and restart BlueStacks 5.
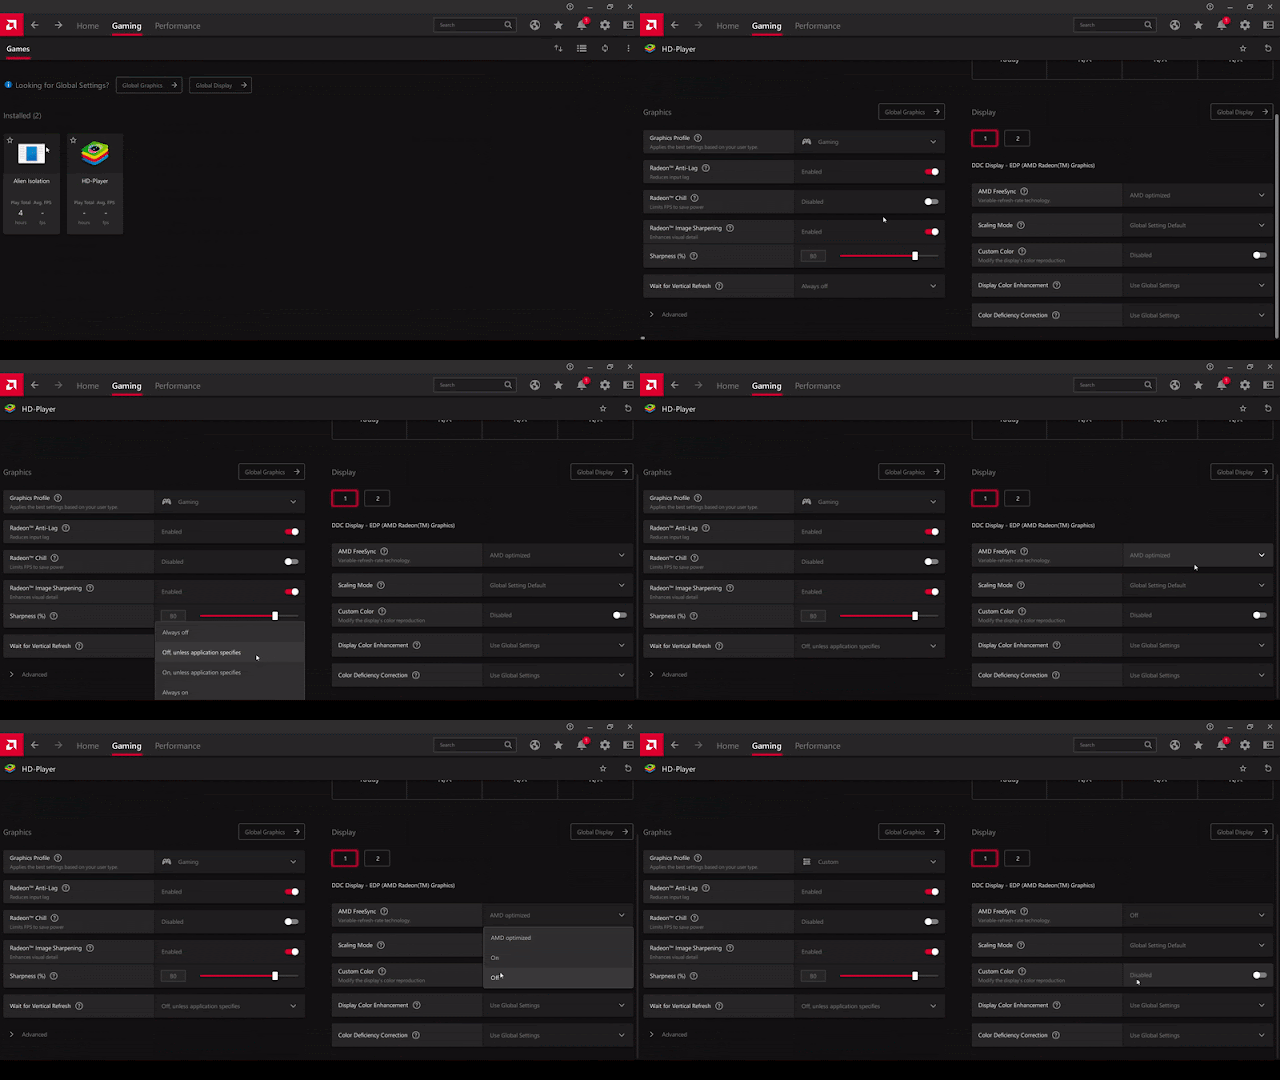
#### AMD Users:
1. Launch "AMD Radeon Software" and click on the "Gaming" tab.
2. Select "More options" and then "Add A Game."
3. Navigate to "C:\Program Files\BlueStacks" and select "HD-Player.exe."
4. Under the Graphics section, set "Wait for Vertical Refresh" to "Off, unless application specifies."
5. Under the Display section, set "AMD FreeSync" to "Off."
6. Restart BlueStacks 5 to apply the changes and enjoy Free Fire at 90 FPS.
By following these steps, you can optimize BlueStacks 5 to run Free Fire at 90 FPS, ensuring smoother gameplay and a competitive edge in your battles. Get ready to elevate your gaming experience to the next level!


0 Comments:
Post a Comment
Subscribe to Post Comments [Atom]
<< Home